Equal Cost Load Balancing with RIP on Packet Tracer:
RIP (Routing information protocol) automatically performs equal cost load balancing. For equal cost load balancing all/both routes have a metric of 1. Learn more when and why we use RIP & RIP Quiz. In this lab we will configure RIP and will observe load balancing with equal cost load balancing in packet tracer.
Lab Objective
In this lab, you need to configure equal-cost load balancing on per destination or per packet basis with debug command.
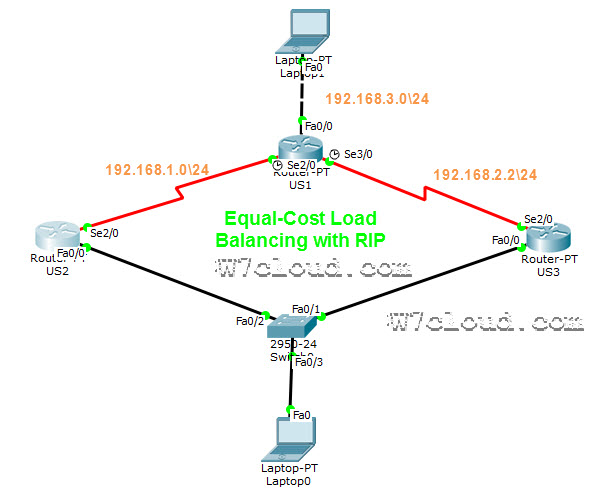
Router US1 has two paths to network 10.0.0.0 with equal metric. There are total three router in our network. Complete all the IP and RIP configuration on packet tracer according to following commands: For more Commands visit packet tracer commands
Router US1 Configuration:
Router>en
Router#conf t
Router(config)#hostname US1
US1(config)#interface f0/0
US1(config-if)#ip address 192.168.3.1 255.255.255.0
US1(config-if)#no shut
US1(config-if)#exit
US1(config)#interface serial 2/0
US1(config-if)#ip address 192.168.1.1 255.255.255.0
US1(config-if)#no shut
US1(config-if)#exit
US1(config)#interface serial 3/0
US1(config-if)#ip address 192.168.2.1 255.255.255.0
US1(config-if)#no shut
US1(config-if)#exit
US1(config)#router rip
US1(config-router)#network 192.168.1.0
US1(config-router)#network 192.168.2.0
US1(config-router)#network 192.168.3.0
Router US2 Configurations:
Router>en
Router#conf t
Router(config)#hostname US2
US2 (config)#interface s2/0
US2 (config-if)#ip address 192.168.1.2 255.255.255.0
US2 (config-if)#no shut
US2 (config-if)#int f0/0
US2 (config-if)#ip address 10.0.0.1 255.255.255.0
US2 (config-if)#no shut
US2 (config-if)#ex
US2 (config)#router rip
US2 (config-router)#network 10.0.0.0
US2 (config-router)#network 192.168.1.1
US2 (config)#exit
US3 Configurations:
Router>en
Router#conf t
Router(config)#hostname US3
US3(config)#int fa0/0
US3(config-if)#ip address 10.0.0.2 255.255.255.0
US3(config-if)#no shutdown
US3(config-if)#int s2/0
US3(config-if)#ip address 192.168.2.2 255.255.255.0
US3(config-if)#no shut
US3(config-if)#exit
US3(config)#router rip
US3(config-router)#network 10.0.0.0
US3(config-router)#network 192.168.2.0
Step 1
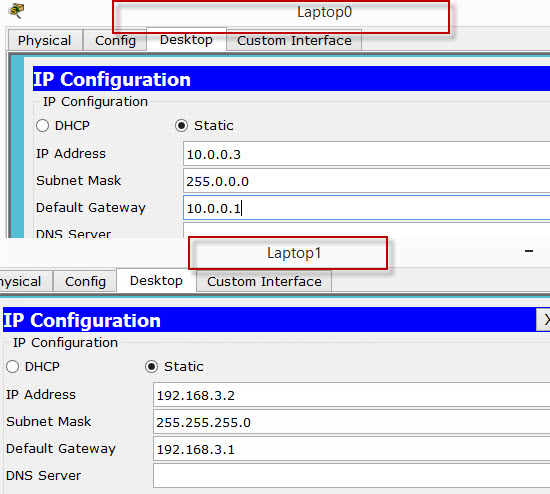
Once you have completed the above configuration, Use ping command to verify LAB and connectivity between all interfaces. Ping from labtop1 to laptop0 and vice versa will be successful. We have following PC configuration in packet tracer for this lab.
Step 2
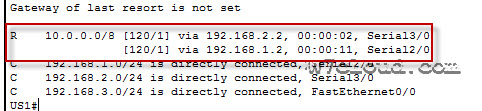
In second step check the routing table on US1, in case of correct configuration you will have two routes to network 10.0.0.0 in its routing table.
Step 3
To configure US1 to perform load-balancing on a per-packet basis, both S2/0 and S3/0 must use process switching. Process-switching forces the router to look in the routing table for the destination network of each routed packet. You can enable process switching on both of US1’s interfaces with the following interface command:
US1(config)#interface serial 2/0
US1(config-if)# no ip route-cache
US1(config-if)#exit
US1(config)#interface serial 3/0
US1(config-if)# no ip route-cache
Step 4
Because there are two routes to the destination network 10.0.0.0 in the table, half the packets will be sent along one path, and half will travel over the other. You can observe this process by using the debug ip packet command, which outputs information about IP packets sent and received by the router:
US1#debug ip packet
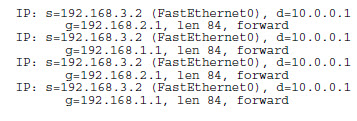
With the debug running, send a few ping packets to 10.0.0.1 from your laptop1 at 192.168.3.2, and then return to US1’s console. As the pings are sent, the router outputs IP packet information. Stop the debug after a few successful pings using this command:
US1#undebug all
Examine the debug output and Look for a line of output that includes d=10.0.0.1, On those lines, look for the interface that the packet was sent out on. The output interface should alternate between Serial2/0 and Serial3/0:
I hope this is informative for you, thank you for reading this and your comments are welcome.